Conway’s Game of Life
Introduction
Consider a hypothetical universe that’s a two-dimensional $xy$ grid of $n\times n$ square cells. Each of these cells represents a person that can be in either one of two states: alive or dead. Each of these persons interacts with its eight neighbors, which are the cells that are horizontally vertically, or diagonally adjacent. The neighbors of three different types of cells (shown in blue) are highlighted below (in red):
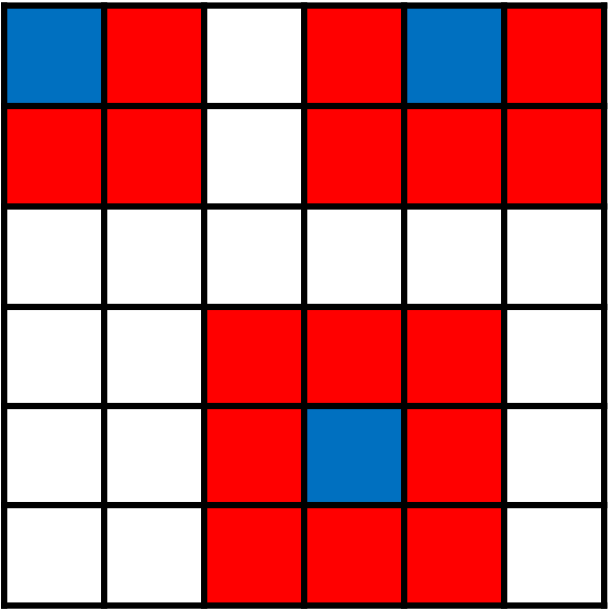
As we can see from this diagram, corner cells have three potential neighbors, edge cells have five potential neighbors, and middle cells have eight potential neighbors.
The rules in this universe are simple. At each point in time, the cells can either die (or come back to life) according to the following set of rule:
- Any live cell with fewer than two live neighbors dies due to underpopulation.
- And live cell with two or three live neighbors lives on to the next generation.
- Any live cell with more than three live neighbors dies due to overpopulation.
- Any dead cell with exactly three live neighbors becomes a live cell through reproduction.
And that’s it! With these set of rules, you can make a wide variety of different dynamic patterns. I encourage you to check out this link to see some of the patterns you can make!
Your task for today will be to implement the rules of the Game of Life using Java and run your program to make these complex patterns. In doing so, you’ll practice many of the things we’ve talked about in Java over the past few weeks, including…
- Matrices and matrix manipulation
for/whileloops- Conditional statements
- Abstraction and good programming practice
Getting Set Up
If you’re familiar with Git repos and cloning repositories, feel free to get started by cloning the project repository at this link. Otherwise, continue on by reading the rest of this section.
A repository, or repo for short, is a storage space for a particular project. Think of it as a folder on your computer, or a Dropbox link, or a shared Google Drive folder when collaborating with friends on a group project. For almost all programmers, our repos are stored on a website called Github, which uses a version-control software called Git to manage changes to different files. We won’t have time to talk about all of these different features of Git right now, but I encourage you to check out this guide for beginners to learn more.
To download the starter template code for this project, go to this link. You’ll see the contents of the file README.md at the bottom of the page. README.md files are included in virtually all repositories, and basically describe what’s in this repo and how to access the program and code. According to the README.md file, let’s click on the src directory, and download the code in both the Application.java and GameOfLife.java files. (Right now, there’s no easy way to download these files individually, so I’d recommend opening each of the files up and just copying and pasting the template code in appropriate Java files in your local Java project for now.)
Starting the Project
All of the code that we need to write for this project should only modify the GameOfLife.java source file. In other words, don’t touch the Application.java file! In starting any project, the first thing to always do is to go through all of the files and have a sense of what the files are individually doing. Go ahead and do this now.
In the GameOfLife.java template code, you can see that the functions that we need to write have already been outlined for us. I’ve attached a snippet of it here:
public class GameOfLife {
    /* Matrix to keep track of the state of the board. */
    private int[][] boardState;

    /* Integer to keep track of the dimension n of the nxn board. */
    private int dim;

    /*
     * Size is the dimensions of the nxn board. initial is an array
     * that represents the initial state of the board.
     */
    public GameOfLife(int size, String[] initial) {
        // TODO
    }

    /*
     * Function to count the number of alive neighbors of
     * boardState[i][j].
     */
    private int countNeighbors(int i, int j) {
        // TODO

        return -1;
    }

    /*
     * Iterate over a round according to the rules of the Game of
     * Life. */
    public void round() {
        // TODO

        return;
    }

    /* Print out the current state of the board in HTML format. */
    public String toString() {
        // Some code that's already been written for us.
    }
}
An outline for the code has already been provided. We have been provided with two private fields: boardState, which keeps track of the state of the board, and dim, which keeps tract of the dimension $n$ of the $n\times n$ board. Of course, you can add (or delete) fields as you find necessary, but the fact that these fields have already been included strongly hints that we should keep them.
Your Task
Your task is to fill in the functions with code that does the required objective of the function written in the comments above each of the respective functions. Feel free to add any additional helper functions when necessary.
Running Your Code
Once you think that your code is working as expected, run your code using the following terminal input while in the src directly:
$ javac *.java
$ java Application [copy-paste arguments here]
A Java application window should then pop up. All you have to do is press the Start the Game of Life! button, and the simulator will begin to run. It might look something like this:
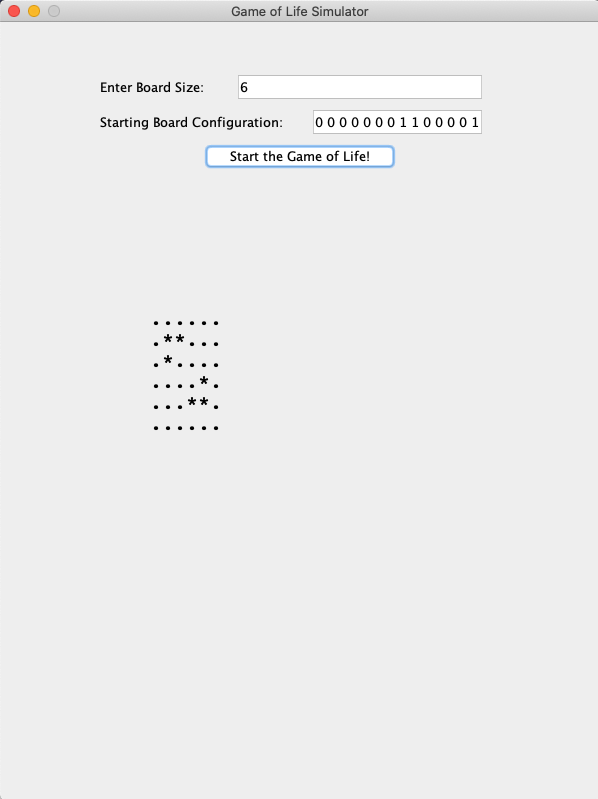
The graphical user interface (GUI) isn’t pretty, but is works. Alive cells are represented by *’s and dead cells are represented by .’s. For the [copy-past arguments here] part of how to run the code, we are supposed to paste a sequence of numbers that represent the initial seed board state. The format of this sequence looks something like this:
3 0 0 1 0 1 0 1 0 1
Here, the first number, 3, represents the dimension $n$ of the board. In this case, this tells us to construct a $3\times3$ board. The remaining $n^2$ numbers should represent the initial state of the board, where 1 represents alive and 0 represents dead. Number arguments are separated by single spaces. These numbers represent the cells going first from left to right over the top column, and then iterating down through all the columns of the board. For example, the above sequence will construct an initial state that looks something like this:
..*
.*.
*.*
Once you understand how this works, try out your program using some of the following sequences:
Beacon
6 0 0 0 0 0 0 0 1 1 0 0 0 0 1 0 0 0 0 0 0 0 0 1 0 0 0 0 1 1 0 0 0 0 0 0 0
Blinker
5 0 0 0 0 0 0 0 1 0 0 0 0 1 0 0 0 0 1 0 0 0 0 0 0 0
Pulsar
15 0 0 0 0 0 0 0 0 0 0 0 0 0 0 0 0 0 0 1 1 1 0 0 0 1 1 1 0 0 0 0 0 0 0 0 0 0 0 0 0 0 0 0 0 0 0 1 0 0 0 0 1 0 1 0 0 0 0 1 0 0 1 0 0 0 0 1 0 1 0 0 0 0 1 0 0 1 0 0 0 0 1 0 1 0 0 0 0 1 0 0 0 0 1 1 1 0 0 0 1 1 1 0 0 0 0 0 0 0 0 0 0 0 0 0 0 0 0 0 0 0 0 0 1 1 1 0 0 0 1 1 1 0 0 0 0 1 0 0 0 0 1 0 1 0 0 0 0 1 0 0 1 0 0 0 0 1 0 1 0 0 0 0 1 0 0 1 0 0 0 0 1 0 1 0 0 0 0 1 0 0 0 0 0 0 0 0 0 0 0 0 0 0 0 0 0 0 0 1 1 1 0 0 0 1 1 1 0 0 0 0 0 0 0 0 0 0 0 0 0 0 0 0 0 0
Spaceship
9 0 0 0 0 0 0 0 0 0 0 0 0 1 0 0 1 0 0 0 0 1 0 0 0 0 0 0 0 0 1 0 0 0 1 0 0 0 0 1 1 1 1 0 0 0 0 0 0 0 0 0 0 0 0 0 0 0 0 0 0 0 0 0 0 0 0 0 0 0 0 0 0 0 0 0 0 0 0 0 0 0
You can compare the results of your patterns to the actual patterns shown on Wikipedia. Note that the Spaceship pattern won’t exactly match because we’re only on a finite dimensional board instead of an infinite one. Feel free to try out your own patterns, too!
Debugging
Unless you’re an amazing programmer (or extremely lucky), chances are your program won’t work the first time. The process of figuring out what’s wrong with your code is called debugging, because the issues with your code are called bugs. There are really great debugging tools out there, but because the process of setting them up and learning how to use them is a bit involved, we’ll save that discussion for another day.
For beginner programmers, one of the most effective strategies for debugging is to simply insert System.out.println() statements in relevant parts of your code, which will allow you to see if different variables and aspects of your program are doing what you expect them to be doing. We’ll be covering debugging more in-depth in a future lesson. In the meantime, feel free to check out this tutorial if you’d like to learn more!
Solutions
An example of the solution code can be found in the sol directory within the linked repository from above.